Overview
Rhythm is a clean, multi-purpose and responsive template. It is suitable for your corporate business sites, a creative agency or a portfolio projects.
Updated: 26/10/2017
Author: NikaDevs
Drupal 9.x
Rhythm - is a multipurpose Drupal theme. It's fully responsive, has moduled structure. You will define what you want to use on your website. Our goal is to save time for our customers, we will work hard providing support, and making our theme better and better in future.
Images showed on the theme is only for demonstration.
Full Drupal Install with demo content
This instruction are for people that have experience manually installing Drupal and importing databases. If you do not feel comfortable performing these steps yourself, contact your server administrator for help. WARNING Do not import the provided SQL file into an existing Drupal database or you will lose all existing data.
Full Drupal installation comes without images, which was only for theme demonstration.
After purchasing theme, you will get a download package. Extract the archive somewhere on your computer.
Click here to watch the VIDEO INSTRUCTION OF INSTALLATION PROCESS or watch it below:
-
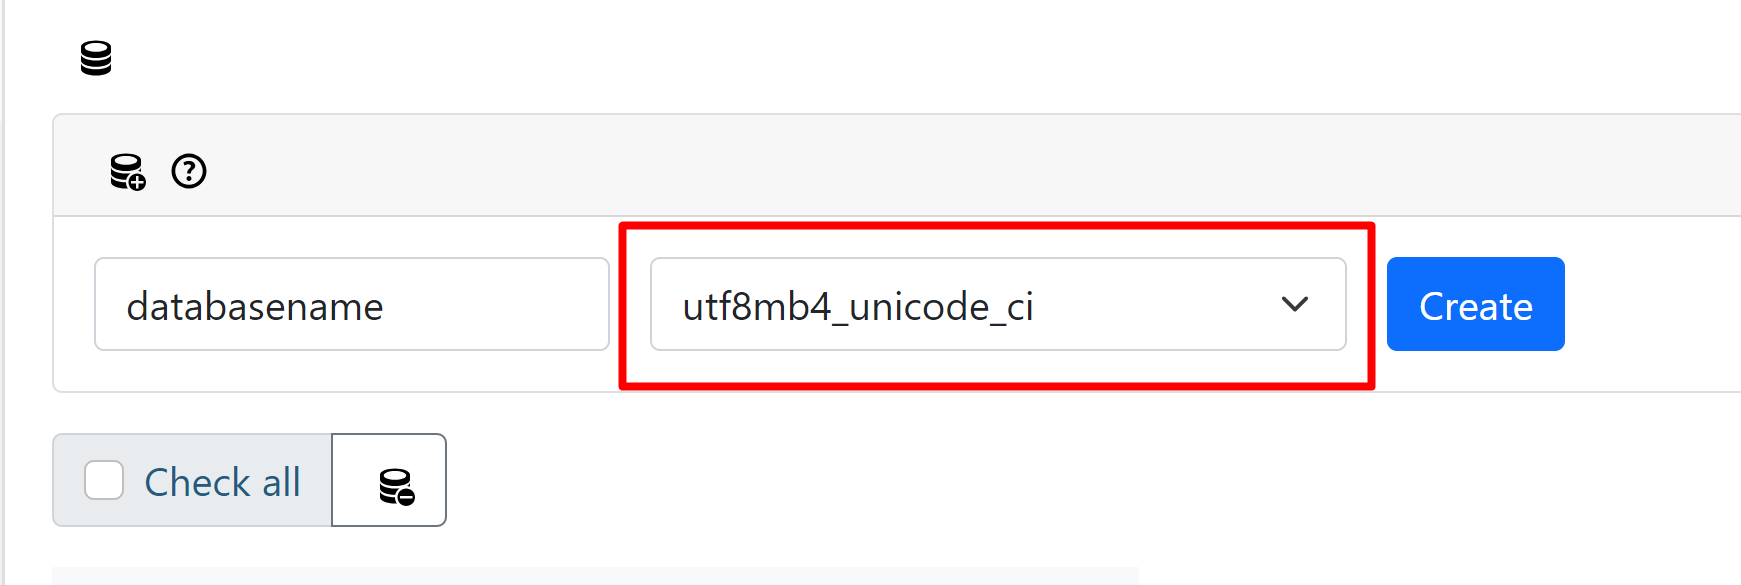
Create a database for this installation of Drupal with Collation utf8mb4_unicode_ci
Import the SQL file fromrhythm_database.zip(phpmyadmin supports archives, so you can upload the whole archive). The PhpMyAdmin might be helpfull for managing your databases. - "Drupal 10 Full Install - Files" folder contains the whole struture which was generated by composer, so you can manage your drupal installation with the Composer (which is required for correct modules updates).
-
Copy the entire contents of the
"Drupal 10 Full Install - Files"folder to the location on your web server where you want your site to be accessed. After this your website will be available as example.com/web. So if you don't wish to use /web prefix, then edit your server configuration or try to edit the .htaccess file. -
This instruction instruction might be helpful for configuring the
/sites/default/settings.php
Please find line 753 and edit the $databases array to match your server database settings:$databases['default']['default'] = array ( 'database' => 'your_database_name', 'username' => 'your_database_username', 'password' => 'your_database_password', 'prefix' => '', 'host' => 'your_host', 'port' => 'your_host_port', 'namespace' => 'Drupal\\Core\\Database\\Driver\\mysql', 'driver' => 'mysql', );
- Login to your site on the /user page, with the username Admin and the password Admin (first letter is CAPITAL) and visit admin/people to change the admin username and password.
- Go through the Drupal configuration found in admin/config options and update all the necessary information to reflect your website. Also be sure to visit /admin/config/media/file-system and update the Temporary directory.
- If you have any errors on the page, then usually this is mean that your server configuration doesn't fit the libraries which coming with our Full Drupal Installation. To fix this you should use the COMPOSER. Just install it and run composer update command. If it will fall then remove the vendor and core directory and the composer.lock file, and run this command again.
Installation for existing sites
Extract the downloaded theme archive somewhere on your computer.
Rhythm modules with content, blocks and views is located at Drupal 10 Existing Installation\web\modules\custom\ folder
The list of required modules which you can find in Drupal 10 Full Install - Files\web\modules\:
- custom/Rhythm_cms - Rhythm theme module.
- custom/Rhythm_shortcodes - Rhythm Shortcodes.
- custom/nikadevs_cms - NikaDevs Main Functions.
- custom/nd_visualshortcodes - NikaDevs Visual Shortcodes (inside nikadevs_cms module).
- custom/Rhythm_main_features - Rhythm Main Features (Import node types, views, settings and other data).
- dropzonejs - Functionality like "Media" in D7
- embed - Used in many fields.
- token - Token module (required by Pathauto).
- entity - Entity
- entity_browser - For Media Files.
- file_browser - Media files popup.
- file_entity File Entity
- shortcode - Shortcodes.
- ctools - Chaos tools
- inline_entity_form - Inline Entity Form
- entity_reference_revisions - Inline Reference Revisions
- entity_embed - Entity Embed
- libraries - Libraries
- state_machine - State Machine
- views_flipped_table - Views Flipped Table
- webform - WebForm
The list of optional modules which are integrated in this theme:
- admin_toolbar - Usefull administrion menu
- pathauto - Pathauto (SEO friendly URLs).
- tb_megamenu - Mega Menu.
- entity_reference_revisions - Entity Reference Revisions
- commerce - Commerce
- profile - Profile (for Commerce)
- flag - flag (for Commerce)
- fivestar - Fivestar (for Commerce)
- address - Address (for Commerce)
- votingapi - Voting API (for Commerce)
- commerce_ext - Commerce ext (for Commerce)
- commerce_variation_cart_form - Commerce Variation Cart Form (for Commerce)
- custom/Rhythm_commerce_features - Rhythm Shop Features (Import node types, views, settings and other data).
- md_slider - MD Mega Slider
- imce - Imce (for MD Mega Slider)
Installation process:
-
Upload from
Drupal 10 Full Install - Files\web\themes\foldercustomto your site folder inweb\themes -
Upload from
Drupal 10 Full Install - Files\web\modules\all modules to your site folder inweb\modules - Go to the Modules page admin/modules and enable all required modules described above, for better experience please enable the theme modules listed from 1 to 5 at the second step.
- Go to admin/appearance enable the Jango Sub Theme theme and set it as the default theme. Make sure that you setup Claro as default admin theme.
- Go to the Visual Shortcodes section to check how to configure this module.
- Dont forgot to read the Site Content section to understand how to work with website and how to use Visual Shortcodes. Because once you will enable the theme it will not looks like on our demo (for this you need to use the Full Drupal Installation).
Installation Commerce:
Please read the Commerce module page before installing it, because in Drupal 8 it can be installed via Composer. If you already have enabled Commerce module then you can only enable the Jango Shop Features module which will import all used in Jango theme nodes, views and other settings. You can try to enable Commerce without composer, for this replace vendor folder with your vendor folder.
Import Content
The Content Import was disabled on our Installation because currently Drupal 9 doesn't support this feature correctly. We tried to use the Default Content module and to use the Drupal core functions, but this import works only on the CLEAN drupal installation, without any nodes and blocks. This is mean that the content importing with theirs unique IDs, and if you have the same ID in your system then you will got Fatall Error.
Rhythm Sub Theme
Rhythm comes with a sub-theme called Rhythm Sub Theme that you can use to make customizations to the style and template structure of the parent theme without having to modify the parent theme itself. This is very useful then you will update the Rhythm theme as we release updates.
There is an empty stylesheet in /themes/custom/Rhythm_sub/css/__custom.css. Rename this file to custom.css and add your custom code on this file.
You can also copy any template file from the /themes/Rhythm/templates folder into the /themes/custom/Rhythm_sub/templates folder and drupal will use Custom theme template.
Site Content
Most of the site features stored in the blocks, so you can easily build your page using Layout Builder or Visual Shortcodes
All content is high flexible because it's controlled by Visual Shortcodes module. If you wish to create a Menu then you also should use our shortcodes, just create a block, click to add new Shortcode, select Menu shortcode, after this configure it as you wish. Now you can assign this block where you need, for example at the top and it will be showe on the page. The same thing regarding footer - you can create a Row shortcode, put inside Columns with required settings, and put inside them all required blocks, views or html code via Visual Shortcodes.
Layout Builder create only for controlling the whole page structure, so you can manage how is the regions (which contain drupal blocks) will looks at the page.
But also there is a pages with dynamical content, which you can edit in Management Pages.
They are controled by Views, so you can found and edit them on the Views Page: admin/structure/views

For example you want to create a new Gallery page with 3 Columns, and link to this page in Menu:
- Go to Main Menu settings page: admin/structure/menu/manage/main-menu
- Click on the Add Link button:
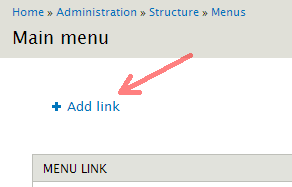
- Enter title Gallery and URL: gallery-3-column. Other settings leave by default. Click Save.
The URL you can take from the View edit page:
- On the redirected Main Menu settings page, drag your item there you need and click Save Configuration.
- Now your item appears in the Header menu, and showed Gallery Items in 3 columns.
If you want to change URL to another, for example gallery:
- Go to Gallery 3 Cols settings page: admin/structure/views/view/gallery/edit/page_2
- Click on the Path link under Page Settings:
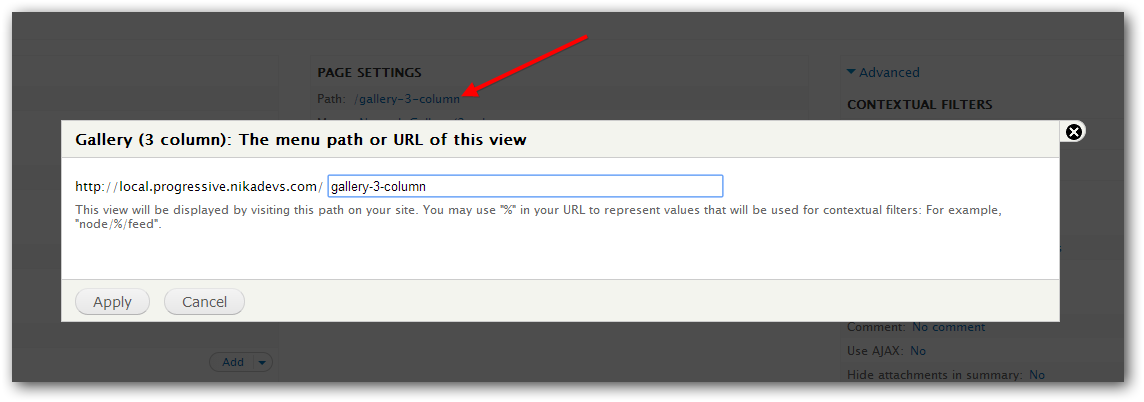
- Enter gallery in the textfield and click Apply.
- Now save settings by clicking the Save on the top right corner of the page.
- If you are already created menu link for this page, then use Edit link in front of the Porfolio menu link on the Main Menu settings page, to change URL to new Gallery.
- Please note what if you are showing some specific blocks or using layout of Layout Builder for this page, then you need to edit their Show on pages fields.
Shortcodes
Shortcodes are actually macros to be used in the text of contents. These macros change the text of the content and format the given part through the theme engine. Using them you can easy create complex elements such Accordion, Tabs, Quotes and others.
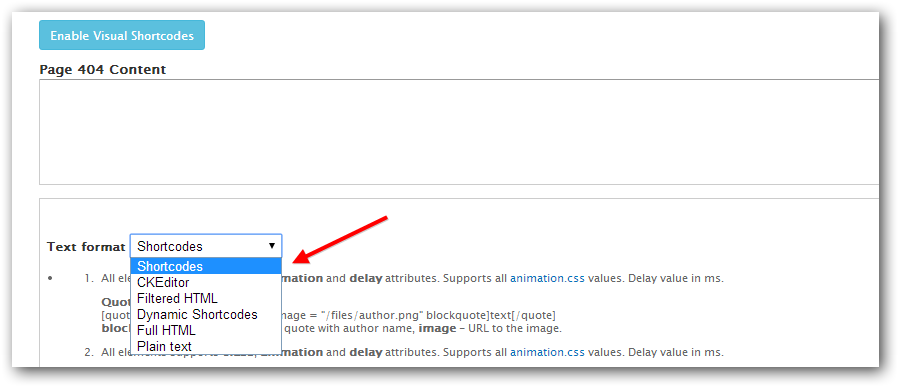
Then you edit textarea, select Text format to Shortcodes
You can manually add/edit any shortcode for each Text Format on it's configure page admin/config/content/formats.
Visual Shortcodes
This theme comes with amazing Visual Shortcodes module which allow you to add/edit/delete shortcodes without typing the code.
Important! You should open and save the Visual Shortcodes form at leasts ones and after this clear the Drupal cache. Before using this module open the settings page and configure it as you wish: admin/config/content/nd_visualshortcodes. The default settings is Enable for next Text Formats: shortcode_dynamic, Default HTML tag Format: full_html
If you don't see shortcodes on the list, then please open the Dynamic Shortcodes Text Format page admin/config/content/formats/manage/shortcode_dynamic and select all shortcodes at the Filter settings section, under Shortcodes tab.
- Autostart Visual Shortcodes editor - Visual Shortcodes will be automaticaly loaded and ready to work once the page will be loaded, so you don't need to click on the "Enable Visual Shortcodes" link.
- Confirm to delete shortcode - Will show up the confirmation window each time then you deleting any shortcode.
- Enable for next Text Formats - Visual Shortcodes will appears only for this formats.
- Default HTML tag Format - Configure which format will be used for HTML shortcode. By Default this is CKeditor format, which is configured to work with CKeditor, but you may install any other WYSIWYG editor.
Short description of main options:
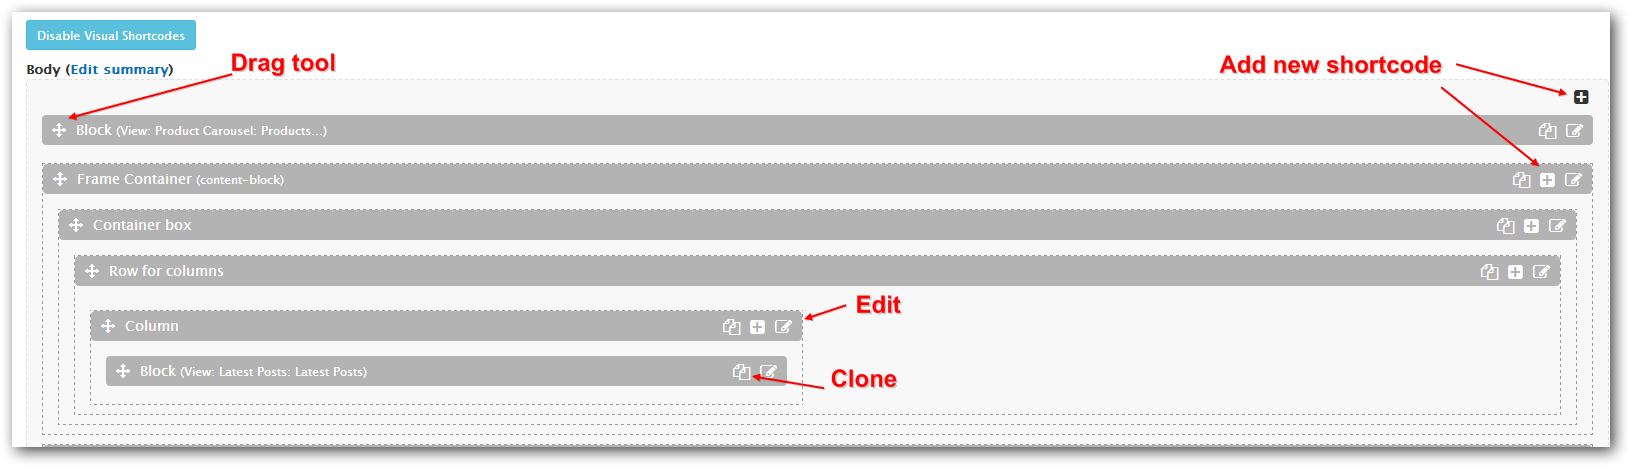
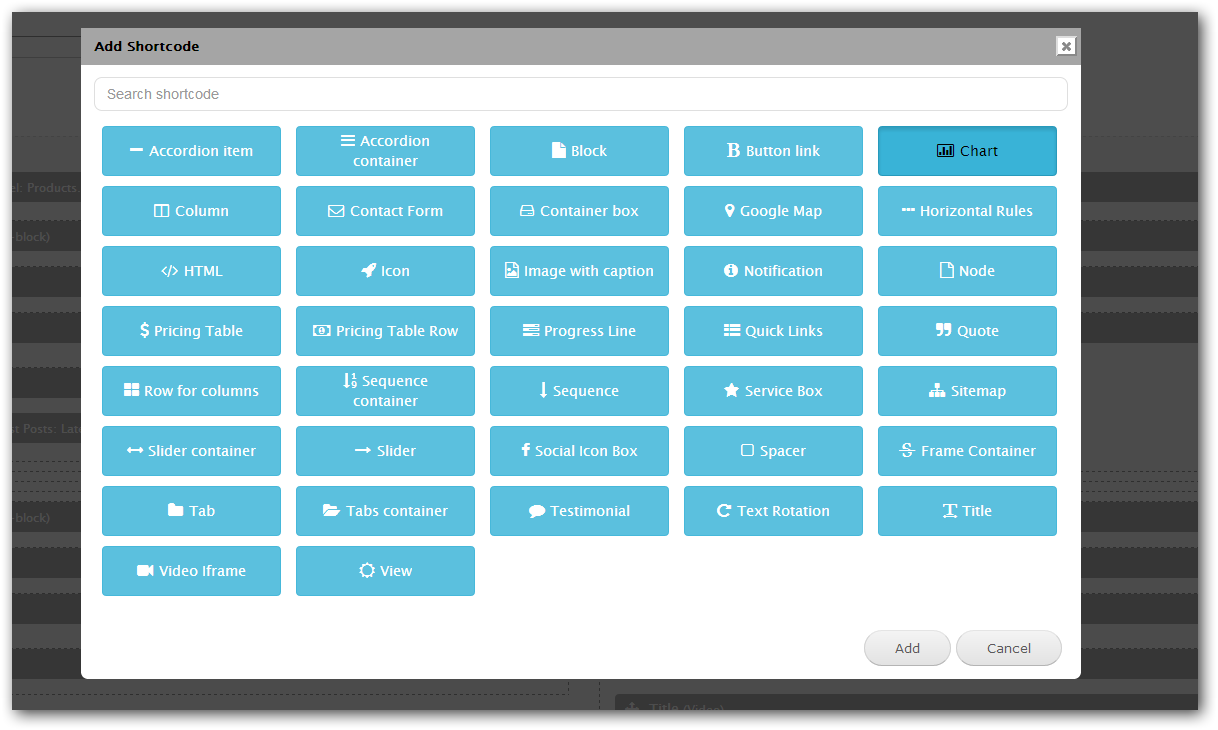
To add new shortcode click on the add shortcode icon, and will be loaded window with all allowed shortcodes. You can also type shortcode name in the search field and all not related shortcodes will disappers. Click on the required shortcode and on the "Add" button:
Shortcode edit sections which appears then you clicked on the edit shortcode icon:
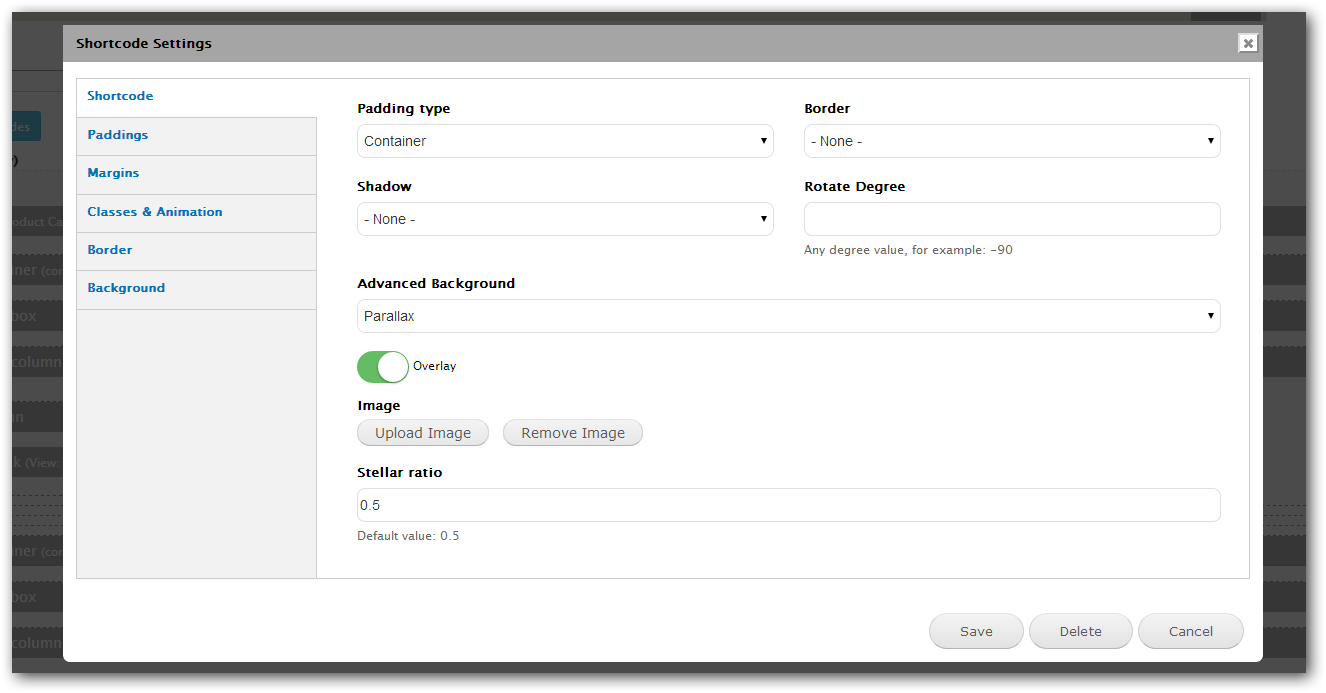
- Shortcode - Showed individual shortcode settings if they are exists.
- Paddings - Edit shortcode container paddings.
- Margins - Edit shortcode container margins.
- Classes & Animation - Here you can add extra classes, setup text align, block animation and block animaton delay.
- Border - Allow to setup border and border radius.
- Background - Allow to setup background color or background image.
Some shortcodes should be used in combination, so if you clicked to add shortcode inside those shortcodes, by default you will see shortcode which should be inserted:
- Accordion container - Accordion Item
- Pricing Table - Pricing Table Row
- Row for columns - Column
- Slider container - Slider
- Tabs container - Tab
One Page
First of all create new menu, or use your existing menu.
Configure the menu link URL with required anchor name, for example #About
After this create new block or page with shortcode Menu and select your menu name. Assign this block to the required region.
Now you can create the content using the Visual Shortcodes. For configuring the anchor name which you type in the Menu item URL field please click on the section Classes, ID, Animation and type the anchor name in the ID field.
Layout Builder
You can find Layout Builder on the Theme Setting page:
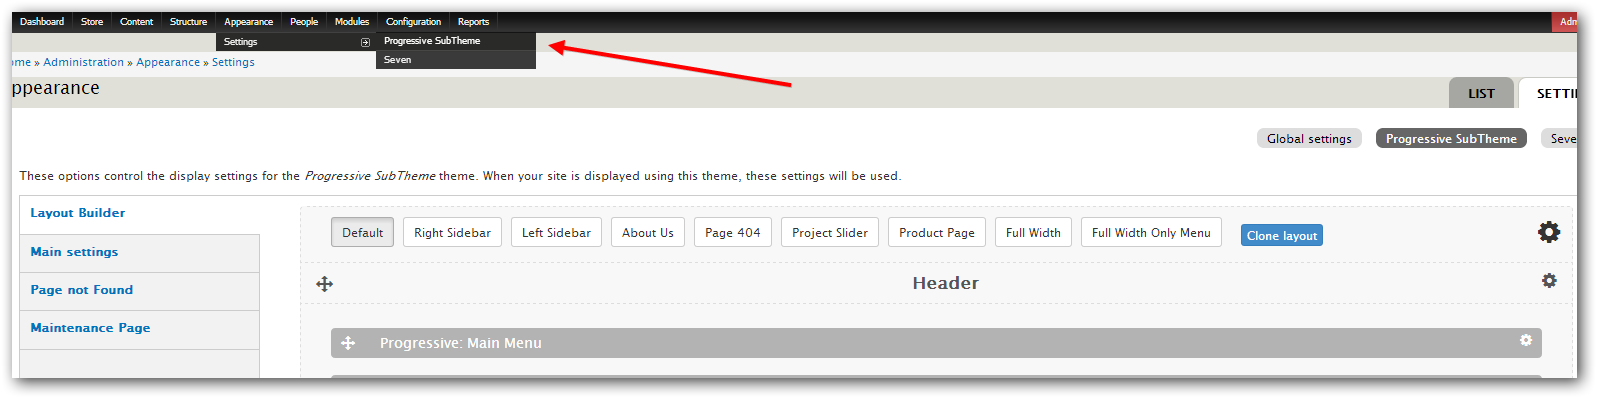
The video overview of main functions: YouTube
The Layout Builder allow you to create any structure for any page, using Drag and Drop elements.
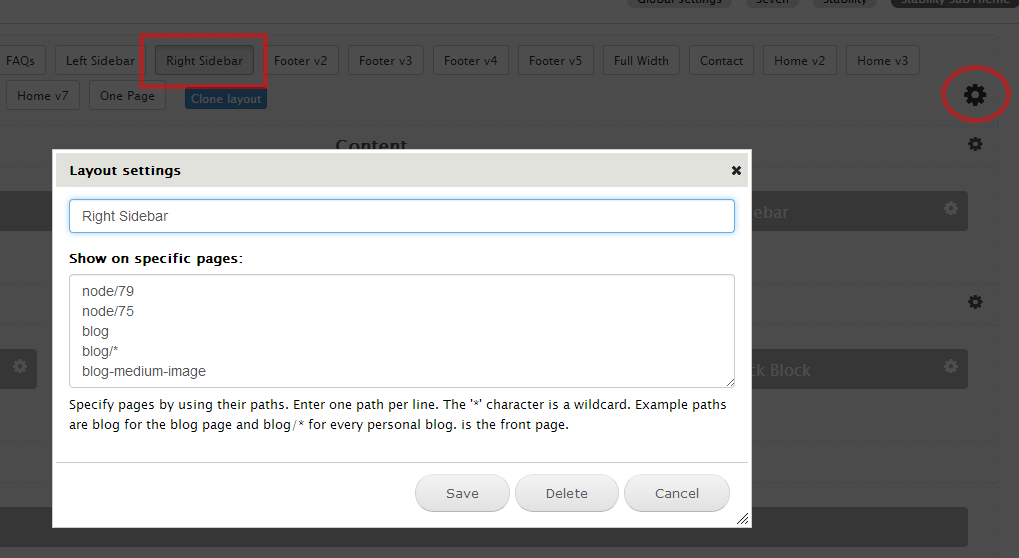
You can configure default layout and layout for some specific page or pages.
Each layout have name and Show on Pages field, there you can enter any URLs there is this layout will be used.
Layout have 3 type of elements:
-
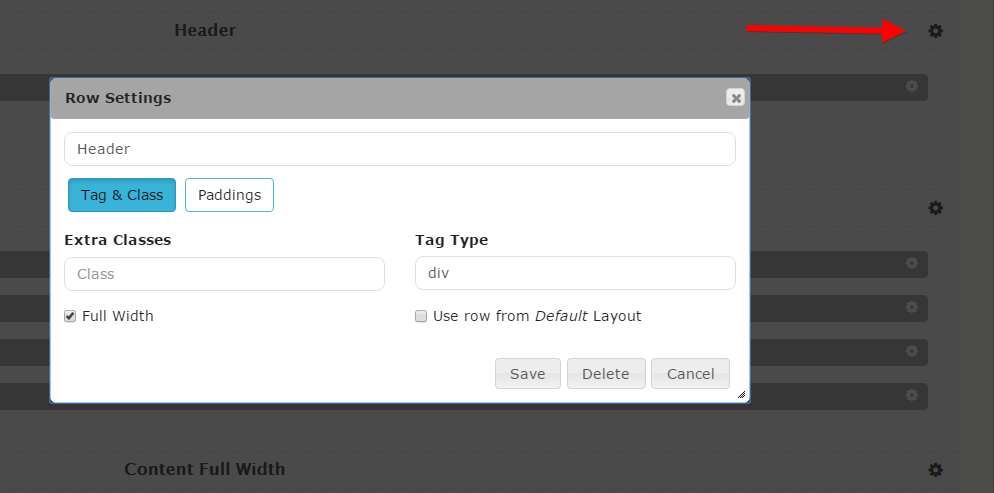
Row - used for combining elements, also by default they styled in the theme with standart theme spacing.
You can assign extra classes for styling, setup Paddings, change Tag type or disable it, and set this row as Full Width.
If User row from Default Layout option selected, then LayoutBuilder will search in the Default Layout the Row with the same name and will use it settings and regions. This may be helpfull if you want to use the same Row in many pages, for example Footer.
-
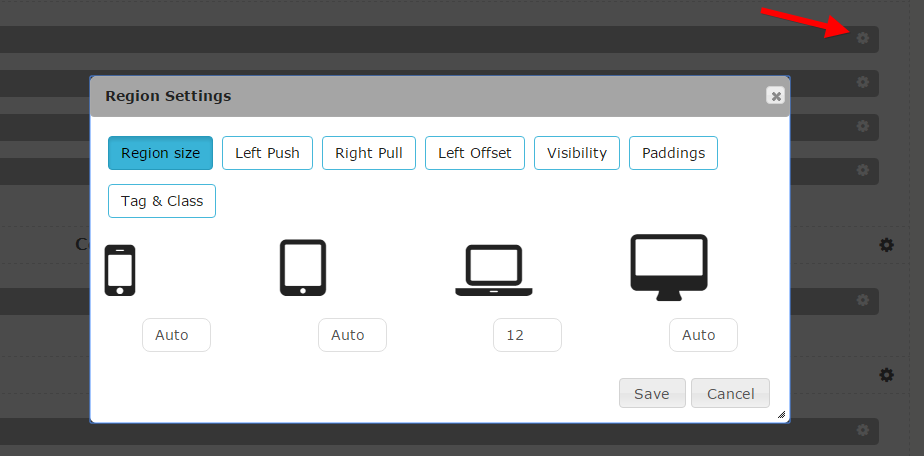
Regions - Theme regions, which can have a many blocks inside. Think about this like about grouping required blocks inside, or showing blocks which are the same on the all pages.
To configure regions blocks visit default block settings page: admin/structure/block
Region supports responsibility, and there is all list of options to configure how many columns it will take on any device, and if it will be showed/hidden.
You can assign extra classes for styling, change Tag type or disable it, and select Animation with Delay of the animation.
Updating Process
Please be carefull when updating your Rhythm theme and modules to newest version, and always made Backups of code and database. Use this short instruction:
After copying new files you need to clear the Drupal cache: admin/config/development/performance.
Go to Changelog section, if there is announced changes by Features, then you need:
- Enable the module Features if it's not enabled.
- Go to main Features page: admin/config/development/features
- Click on the NikaDevs section, select Rhythm Features feature and click Save Changes
- Sometimes there is a changes in the nodetypes or views, in this case you will see Needs review in the STATE column.
- Click on the Rhythm Features feature link. You will see a list of features with checkboxes. Select them all, or only which you need and click Revert components. Note what if you made some changes in this fields/views/image styles or other features, this operation will revert them.
Changelog
Version 1.6 - October 26, 2017
Release of the Drupal 9